Multiple Buttons on 1 Analog Pin
Multiple Buttons on 1 Analog Pin
Introduction

The Arduino uno board has 12 availabe digital I/O pins and 6 analog input pins, sometimes, on complex or 'big' projects, we run out of digital pins. In this tutorial you will learn how to use multiple buttons on one analog pin.
For example, if you have 4 buttons, you will need 4 digital pins to read them. But, if you connect them all together, with different resistors, you can read them from only one analog pin!
Let's see how it works!
For example, if you have 4 buttons, you will need 4 digital pins to read them. But, if you connect them all together, with different resistors, you can read them from only one analog pin!
Let's see how it works!
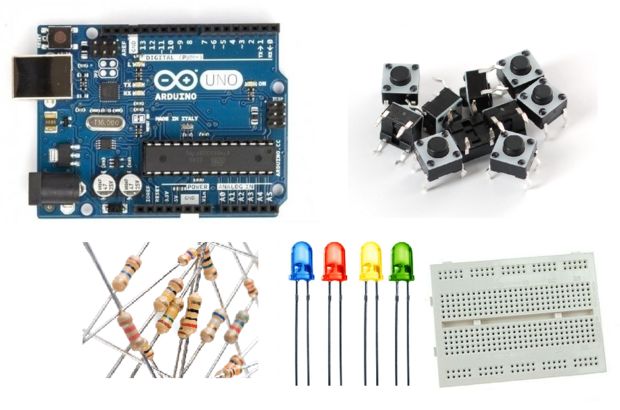
What you will need - Hardware
For this tutorial you will need:
|  |
How it works
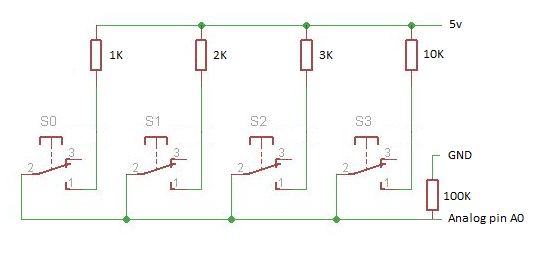
It's quite simple, every time a button is pressed, the Arduino receives an analog value from 0 to 1023. Depending resistance to each button this value changes. By this way we can recognize which button was pressed.
Now let's see how it works in practice!
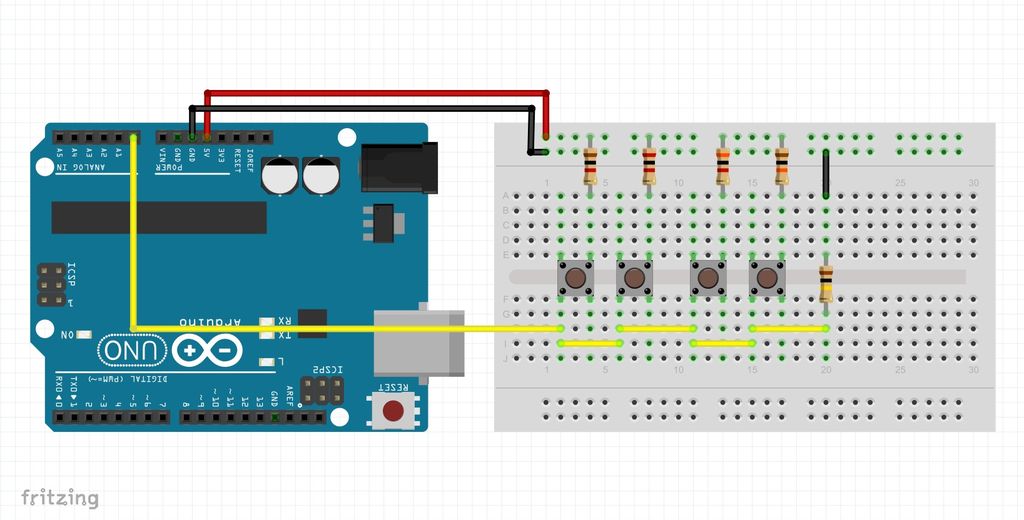
Build the circuit above and program the Arduino with the following sketch.
Now let's see how it works in practice!
Build the circuit above and program the Arduino with the following sketch.
The Code ::
*******************************************************************************
/* Print values from analog pin A0 to serial monitor */
void setup()
{
Serial.begin(9600);
}
void loop()
{
Serial.println(analogRead(A0));
delay(100);
}
*******************************************************************************
As you can see if no button is pressed the value obtained is 0. Now press the first button (with 1K resistor) and keep a notice with the value that you received. Keep going with all of them.
Mine values are:
Tip: You can use as many buttons you want.
Mine values are:
Tip: You can use as many buttons you want.
The Circuit

Let's see how we can use these values to control some leds. Build the above circuit, the connections are pretty easy.

The code
****************************************************************
/* Multiple buttons on one Analog pin Example
Use 4 buttons to one bus to control 4 LEDs
*/
//Constants
const int yellowLed = 2;
const int redLed = 3;
const int blueLed = 4;
const int greenLed = 5;
//Variables
int buttonValue; //Stores analog value when button is pressed
void setup()
{
pinMode(yellowLed, OUTPUT);
pinMode(redLed, OUTPUT);
pinMode(blueLed, OUTPUT);
pinMode(greenLed, OUTPUT);
}
void loop()
{
buttonValue = analogRead(A0); //Read analog value from A0 pin
//For 1st button:
if (buttonValue>=1010 && buttonValue<=1015){
digitalWrite(yellowLed, HIGH);
}
//For 2nd button:
else if (buttonValue>=1000 && buttonValue<=1008){
digitalWrite(redLed, HIGH);
}
//For 3rd button:
else if (buttonValue>=990 && buttonValue<=998){
digitalWrite(blueLed, HIGH);
}
//For 4th button:
else if (buttonValue>=870 && buttonValue<=880){
digitalWrite(greenLed, HIGH);
}
//No button pressed, turn off LEDs
else{
digitalWrite(yellowLed, LOW);
digitalWrite(redLed, LOW);
digitalWrite(blueLed, LOW);
digitalWrite(greenLed, LOW);
}
delay(100);
}
****************************************************************
Well done!

You have successfully completed one more Arduino "How to" tutorial and you learned how to use multiple buttons on only one analog pin!
I hope you liked this, let me know in the comments.
I hope you liked this, let me know in the comments.
Comments
Post a Comment