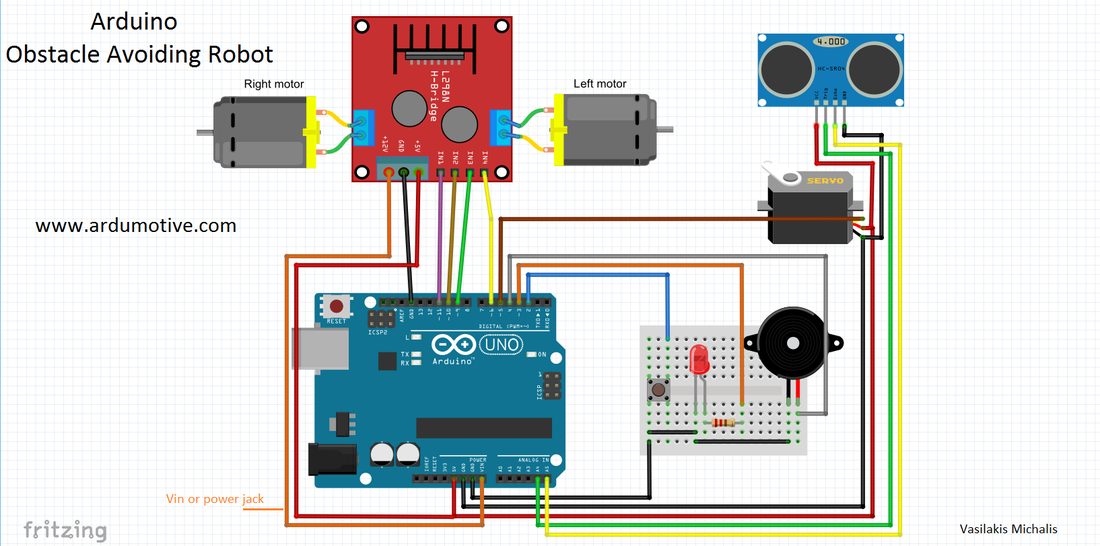
Arduino Obstacle Avoiding Robot Ardunio Computer
In this tutorial I will show you how to make your own obstacle avoiding robot! We will use the Arduino uno board and an ultrasonic sensor. If the robot detects an object in front of it, with the help of a small servo motor, it scans the area left and right in order to find the best way to turn. It has also a notification LED, an buzzer to play a tone when an object is detected and an button for changing the function of the robot (stopped / moving forward). It's very easy to make it! 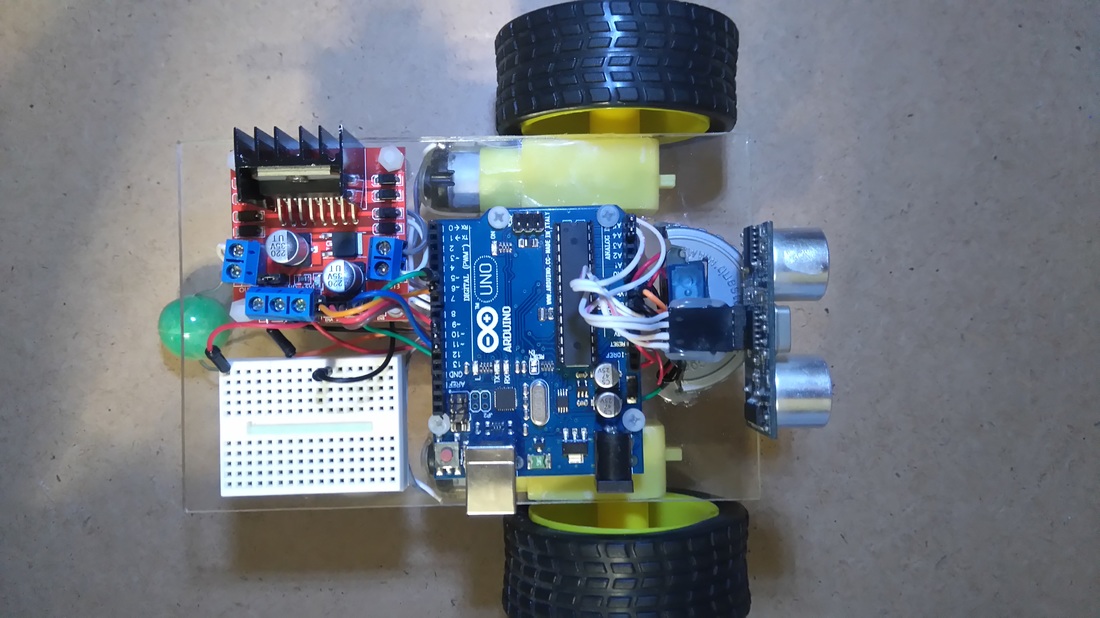
For this project you will need:
You will also need one big (metal) paperclip and an bead to make the back supporting wheel. For the robot base I used a piece of plexiglass (12 x 9.5 cm). You can also use a piece of wood or metal
(or two cd/dvd disks ).
The cost of the entire project is about 20$! Tools: Power: We will use an 9V battery to power on our robot because it's small and cheap,
but it's not very powerful and will be empty after about one hour.
Consider if you want to use a rechargeable battery pack (min 6V, max 7V) that will be
more powerful but it will be also more expensive and bigger than the 9V battery.
ROBOT BASE:
Place all the hardware parts on plexiglass piece and mark it with a pen in order to open the holes with a drill.
(1st image).
Begin with the bottom side, use a super glue to mount motors in the plexiglass piece.
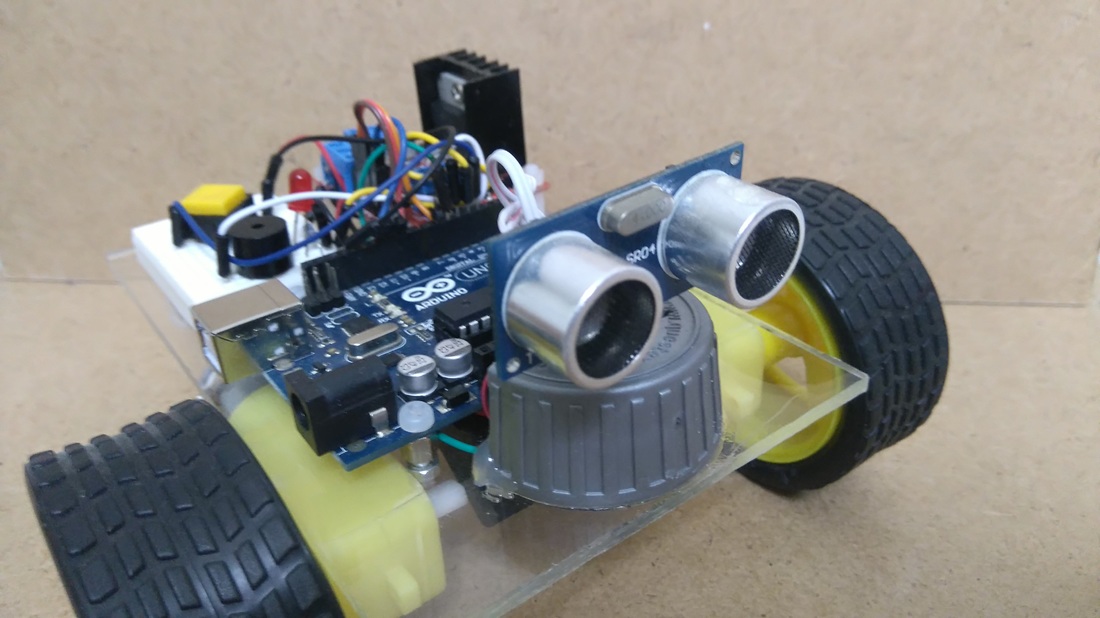
Make sure that they are perfectly aligned - use a triangle ruler (2nd image). Now attach the 9V battery holder.
Tip: You can also open holes for the motors and battery cables .
Use the spacers, screws and nuts to attach the Arduino uno board and the L298 module on plexiglass piece.
The mini breadboard can be easily attached on it with the adhesive tape that already have at the bottom of it
THE EYE::
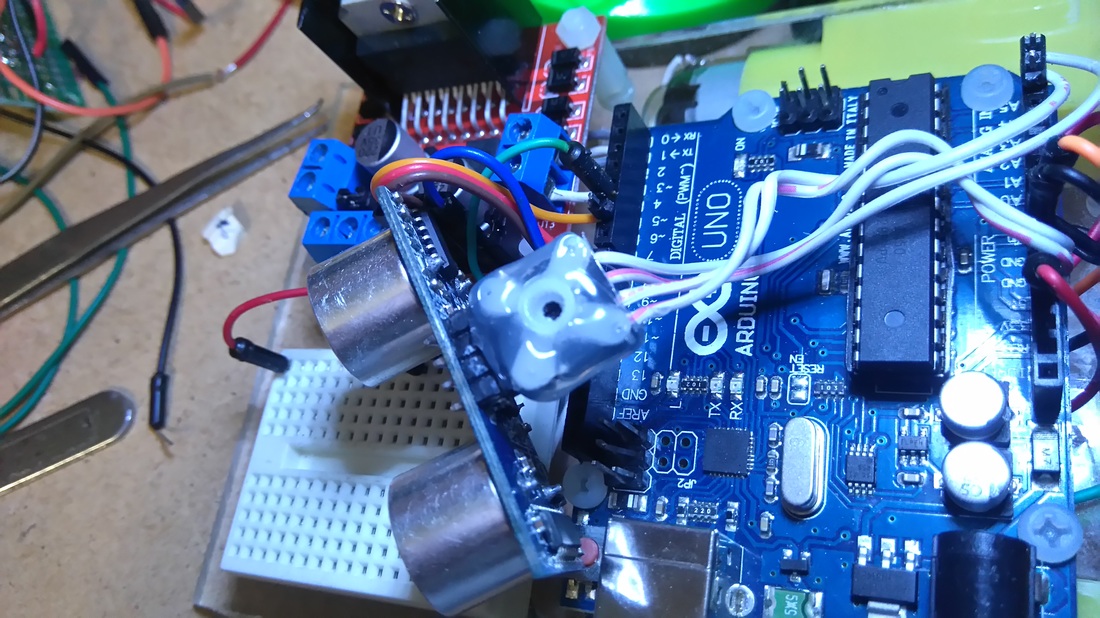
Use a super glue to attach the tiny servo motor in the front side of our robot. Watch the first image above to
understand how to put the ultrasonic sensor in the servo motor by using a small gear piece. The second above image shows the completed part that will be the "eyes" of our robot.
|
******************************************************************************************************
//Libraries
#include <Servo.h>
#include "Ultrasonic.h"
//Constants
const int button = 2; //Button pin to pin 2
const int led = 3; //Led pin (throught resistor) to pin 3
const int buzzer = 4; //Buzzer pin to pin 4
const int motorA1= 6; //motor A positive (+) pin to pin 6 (PWM) (from L298 module!)
const int motorA2= 9; //motor A negative (-) pin to pin 9 (PWM)
const int motorB1=10; //motor B positive (+) pin to pin 10 (PWM)
const int motorB2=11; //motor B negative (-) pin to pin 11 (PWM)
Ultrasonic ultrasonic(A4 ,A5); //Create Ultrsonic object ultrasonic(trig pin,echo pin)
Servo myservo; //Create Servo object to control a servo
//Variables
int distance; //Variable to store distance from an object
int checkRight;
int checkLeft;
int function=0; //Variable to store function of robot: '1' running or '0' stoped. By default is stoped
int buttonState=0; //Variable to store the state of the button. By default '0'
int pos=90; //Variable to store the servo position. By default 90 degrees - sensor will 'look' forward
int flag=0; //Useful flag to keep the button state when button is released
void setup()
{
myservo.attach(5); //Servo pin connected to pin 5
myservo.write(pos); // tell servo to go to position in variable 'pos'
pinMode(button, INPUT_PULLUP);
pinMode(led, OUTPUT);
pinMode(buzzer, OUTPUT);
pinMode(motorA1,OUTPUT);
pinMode(motorA2,OUTPUT);
pinMode(motorB1,OUTPUT);
pinMode(motorB2,OUTPUT);
}
void loop()
{
//Check button state
buttonState = digitalRead(button);
unsigned long currentMillis = millis(); //counting...
//Change main function (stoped/running) when button is pressed
if (buttonState == LOW) {//If button is pressed once...
delay(500);
if ( flag == 0){
function = 1;
flag=1; //change flag variable
}
else if ( flag == 1){ //If button is pressed twice
function = 0;
flag=0; //change flag variable again
}
}
if (function == 0){ //If button is unpressed or pressed twice then:
myservo.write(90); //set servo 90 degress - sensor will look forward
stop(); //robot remain stoped
noTone(buzzer); //buzzer off
digitalWrite(led, HIGH);// and led on
}
else if (function == 1){//If button is pressed then:
//Read distance...
distance = ultrasonic.Ranging(CM); //Tip: Use 'CM' for centimeters or 'INC' for inches
//Check for objects...
if (distance > 10){
forward(); //All clear, move forward!
noTone(buzzer);
digitalWrite(led,LOW);
}
else if (distance <=10){
stop(); //Object detected! Stop the robot and check left and right for the better way out!
tone(buzzer,500); // play a tone
digitalWrite(led,HIGH); // turn the led on
//Start scanning...
for(pos = 0; pos < 180; pos += 1){ //goes from 0 degrees to 180 degrees
myservo.write(pos); //tell servo to go to position in variable 'pos'
delay(10); //waits 10ms for the servo to reach the position
}
checkLeft = ultrasonic.Ranging(CM); //Take distance from the left side
for(pos = 180; pos>=0; pos-=1){ //goes from 180 degrees to 0 degrees
myservo.write(pos); //tell servo to go to position in variable 'pos'
delay(10); //waits 10ms for the servo to reach the position
}
checkRight= ultrasonic.Ranging(CM);
myservo.write(90); // Sensor "look" forward again
//Finally, take the right decision, turn left or right?
if (checkLeft < checkRight){
left();
delay(400); // delay, change value if necessary to make robot turn.
}
else if (checkLeft > checkRight){
right();
delay(400); // delay, change value if necessary to make robot turn.
}
else if (checkLeft <=10 && checkRight <=10){
backward(); //The road is closed... go back and then left ;)
left();
}
}
}
}
void forward(){
digitalWrite(motorA1, HIGH);
digitalWrite(motorA2, LOW);
digitalWrite(motorB1, HIGH);
digitalWrite(motorB2, LOW);
}
void backward(){
digitalWrite(motorA1, LOW);
digitalWrite(motorA2, HIGH);
digitalWrite(motorB1, LOW);
digitalWrite(motorB2, HIGH);
}
void left(){
digitalWrite(motorA1, HIGH);
digitalWrite(motorA2, LOW);
digitalWrite(motorB1, LOW);
digitalWrite(motorB2, HIGH);
}
void right(){
digitalWrite(motorA1, LOW);
digitalWrite(motorA2, HIGH);
digitalWrite(motorB1, HIGH);
digitalWrite(motorB2, LOW);
}
void stop(){
digitalWrite(motorA1, LOW); digitalWrite(motorA2, LOW);
digitalWrite(motorB1, LOW);
digitalWrite(motorB2, LOW);
}
*******************************************************************************************************
For example, try to change the '10' cm value that is the distance that will make the robot to stop and 'look' for a clear path.
Note: if your robot doesn't move forward, try to change the pins of the motors (motorA1 and motorA2 or motorB1 and motorB2).
Can u share the "ultrasonic.h" user defined function..
ReplyDelete