How to use the DS18b20 Temperature Sensor
Temperature
In this tutorial you will learn how to use DS18B20 temp sensor with Arduino. The temperature will be printed on the serial monitor of Arduino IDE.
Before we start let's see more information about this sensor.
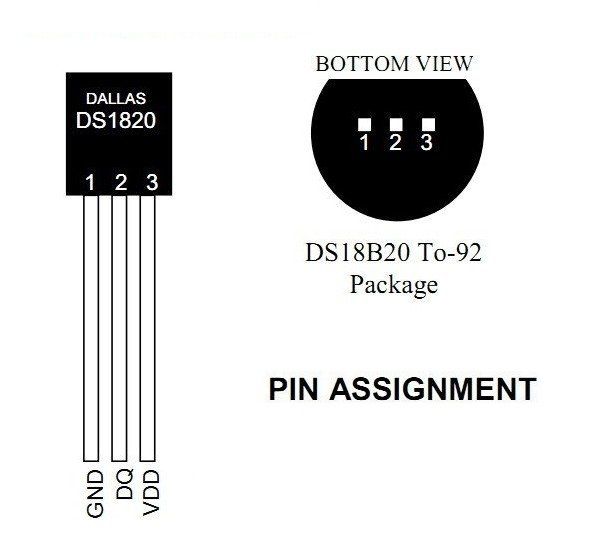
About DS18B20 sensor
The DS18B20 communicates over a 1-Wire bus that by definition requires only one data line (and ground) for communication with Arduino. It has an operating temperature range of -55°C to +125°C and is accurate to ±0.5°C over the range of -10°C to +85°C. In addition, the DS18B20 can derive power directly from the data line (“parasite power”), eliminating the need for an external power supply.
Each DS18B20 has a unique 64-bit serial code, which allows multiple DS18B20s to function on the same 1-Wire bus. Thus, it is simple to use one microprocessor to control many DS18B20s distributed over a large area. Applications that can benefit from this feature include HVAC environmental controls, temperature monitoring systems inside buildings, equipment, or machinery, and process monitoring and control systems.
Each DS18B20 has a unique 64-bit serial code, which allows multiple DS18B20s to function on the same 1-Wire bus. Thus, it is simple to use one microprocessor to control many DS18B20s distributed over a large area. Applications that can benefit from this feature include HVAC environmental controls, temperature monitoring systems inside buildings, equipment, or machinery, and process monitoring and control systems.
 |
Basic Features:
|
Find more info here: datasheet
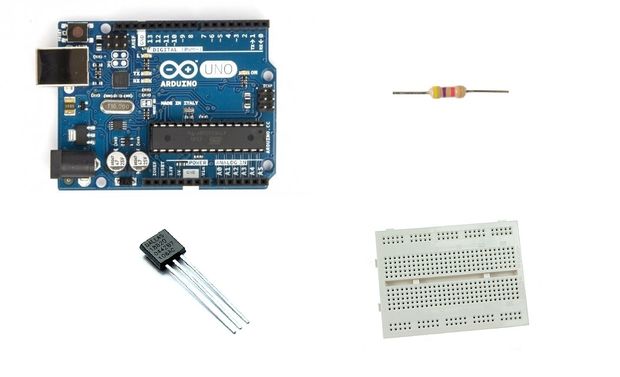
What you will need - Hardware
For this project you will need:
|  |
The Circuit
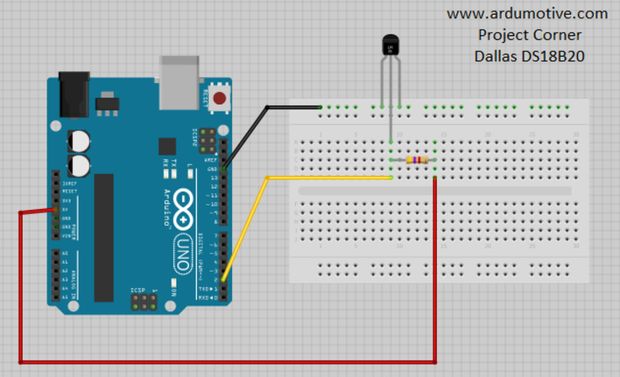
The connections are pretty easy, see the image above with the breadboard circuit schematic.
The code
Here's the code !
Why "byIndex"? You can have more than one IC on the same bus. 0 refers to the first IC on the wire! Try to add a second sensor and include the following command in your code: Serial.println(sensors.getTempFByIndex(1));
Why "byIndex"? You can have more than one IC on the same bus. 0 refers to the first IC on the wire! Try to add a second sensor and include the following command in your code: Serial.println(sensors.getTempFByIndex(1));
************************************************************************
/* Arduino DS18B20 temp sensor tutorial */
//Include libraries
#include <OneWire.h>
#include <DallasTemperature.h>
// Data wire is plugged into pin 2 on the Arduino
#define ONE_WIRE_BUS 2
// Setup a oneWire instance to communicate with any OneWire devices (not just Maxim/Dallas temperature ICs)
OneWire oneWire(ONE_WIRE_BUS);
// Pass our oneWire reference to Dallas Temperature.
DallasTemperature sensors(&oneWire);
void setup(void)
{
Serial.begin(9600); //Begin serial communication
Serial.println("Arduino Digital Temperature // Serial Monitor Version"); //Print a message
sensors.begin();
}
void loop(void)
{
// Send the command to get temperatures
sensors.requestTemperatures();
Serial.print("Temperature is: ");
Serial.println(sensors.getTempCByIndex(0)); // Why "byIndex"? You can have more than one IC on the same bus. 0 refers to the first IC on the wire
//Update value every 1 sec.
delay(1000);
}
************************************************************************
Note :: Try to change delay time and see how it changes the program. You can also try to connect more ds18b20 sensors!
Well done!
You have successfully completed one more Arduino "How to" tutorial and you learned how to use the DS18B20 temp sensor with Arduino.
Tip: The DS18B20 sensor can be found also in waterproof version. (see image)
I hope you liked this, let me know in the comments.
Tip: The DS18B20 sensor can be found also in waterproof version. (see image)
I hope you liked this, let me know in the comments.
Comments
Post a Comment