How to use a Keypad
Keypad or Numpad
Introduction

A keypad is a set of buttons arranged in a block or "pad" which usually bear digits, symbols and usually a complete set of alphabetical letters. If it mostly contains numbers then it can also be called a numeric keypad. Keypads are found on many alphanumeric keyboards and on other devices such as calculators, push-button telephones, combination locks, and digital door locks, which require mainly numeric input.
In this tutorial you will learn how to use a Numpad (numeric keypad) with Arduino uno.
In this tutorial you will learn how to use a Numpad (numeric keypad) with Arduino uno.
What you will need - Hardware
For this tutorial you will need:
|  |
The Circuit
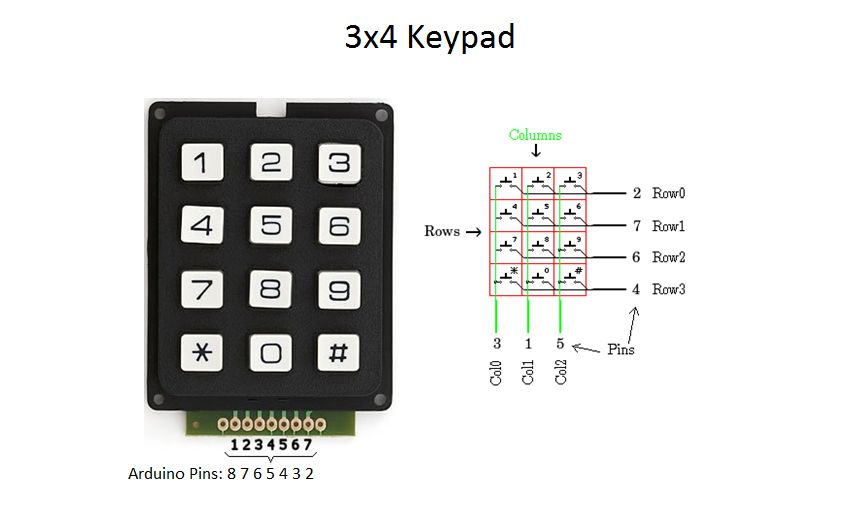
We are using 7 pins keypad with 3 columns and 4 rows.
Note:
If your keypad doesn't work with code on next step you must change the connections above and the pin numbers on those commands. Search the web for additional help or find the datasheet for your keypad.
Note:
If your keypad doesn't work with code on next step you must change the connections above and the pin numbers on those commands. Search the web for additional help or find the datasheet for your keypad.
The code
About the code:
The keypad that we are using has 4 rows and 3 columns:
The keypad that we are using has 4 rows and 3 columns:
*********************************************************************************
/* How to use a Keypad with Arduino uno */
#include <Keypad.h>
const byte ROWS = 4; //four rows
const byte COLS = 3; //three columns
char keys[ROWS][COLS] = {
{'1','2','3'},
{'4','5','6'},
{'7','8','9'},
{'*','0','#'}
};
//Change the following pins your yours keypad pinout!
byte rowPins[ROWS] = {7, 2, 3, 5}; //connect to the row pinouts of the keypad
byte colPins[COLS] = {6, 8, 4}; //connect to the column pinouts of the keypad
Keypad keypad = Keypad( makeKeymap(keys), rowPins, colPins, ROWS, COLS );
void setup(){
Serial.begin(9600); //Init serial communication
}
void loop(){
//Read if button is pressed
char key = keypad.getKey();
//Print this button to serial monitor
if (key != NO_KEY){
Serial.println(key);
}
}
*********************************************************************************
Well done!

You have successfully completed one more Arduino "How to" tutorial and you learned how to use a keypad with Arduino. I hope you liked this, let me know in the comments.
Comments
Post a Comment